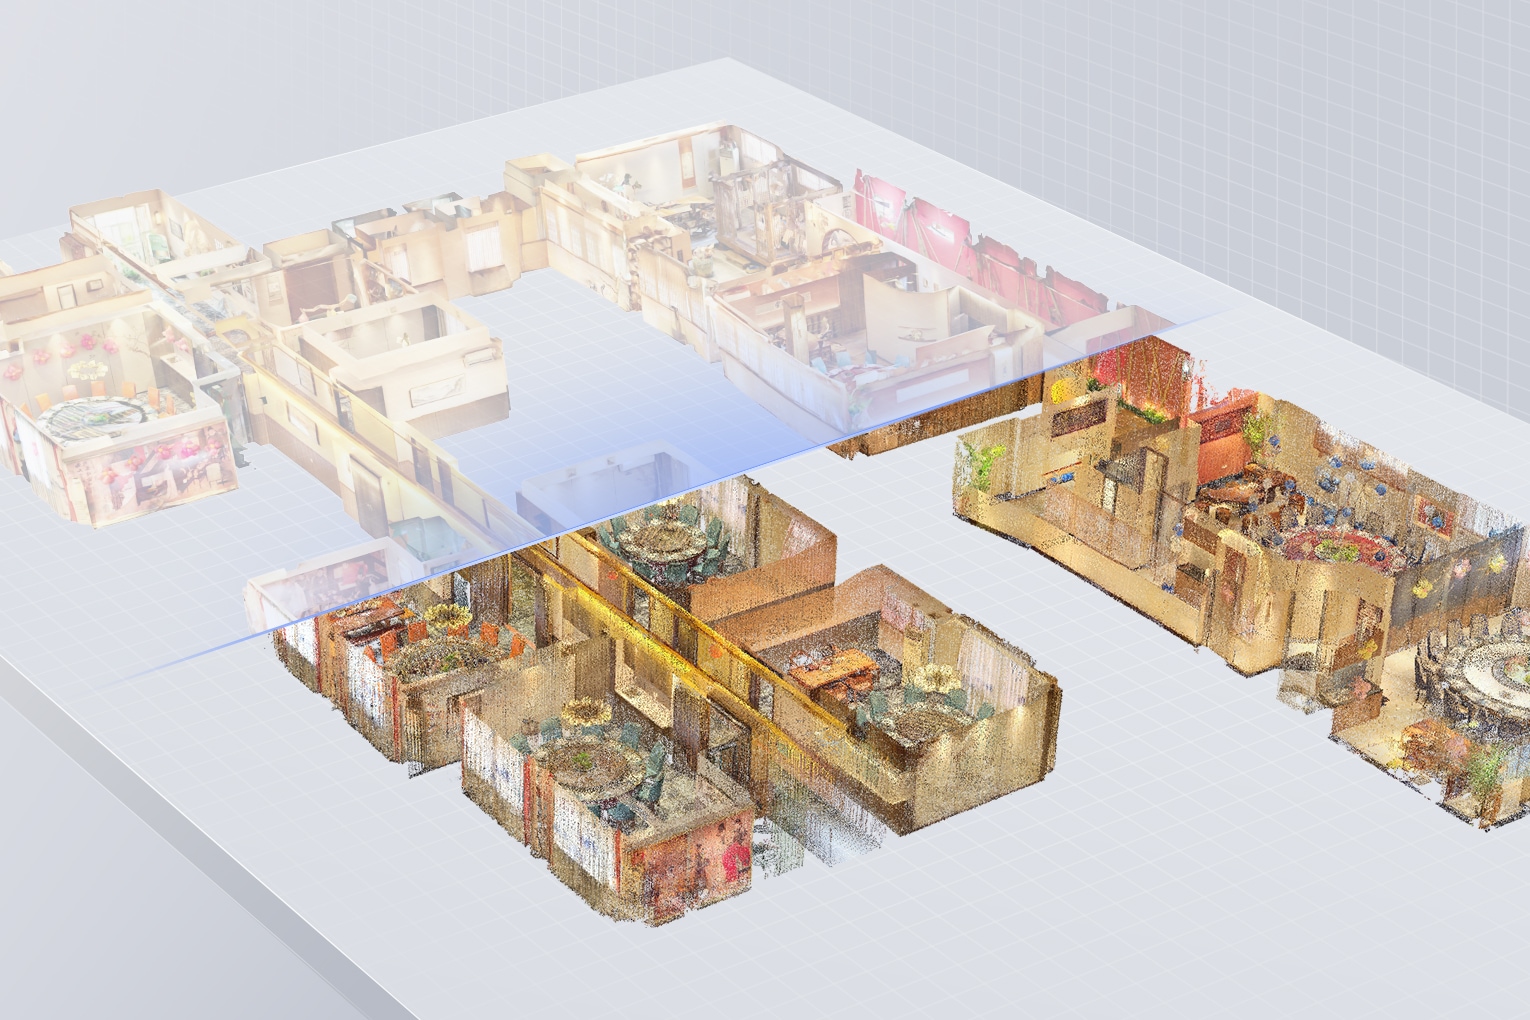
If you've ever started a refurbishment and found the as-built dimensions don't match the drawings on file, you already understand why this matters. The original plan and the building rarely agree — and when an architect, engineer or contractor works from current plans that are wrong, the discrepancy surfaces on the construction site, where it costs the most time and resources to fix. This guide explains what an as-built survey is, how it differs from as-built drawings and traditional measured surveys, whether as-builts are legally required, and how LiDAR scanning has changed the methodology.
Quick takeaways
- An as-built survey records what was actually built — the survey is the measurement; as-built drawings are the documents produced from it
- LiDAR scanning delivers a point cloud accurate to 20mm across the full floor plan — no manual transcription step
- The Galois M2 captures 360° panoramas and LiDAR point cloud data simultaneously — one site visit, two deliverables
What is an as-built survey?
An as-built survey is a detailed and accurate record of a building or site in its current state — what was actually built, not what the original design said. The survey captures the dimensions and layout of the structure, the visible services, and on external work the utility runs, drainage lines and manhole positions. Its purpose is to give every stakeholder — owners, designers, engineers, main contractors and sub contractors — one verifiable snapshot of reality, so future renovations, an expansion, compliance checks or a dilapidations dispute all start from accurate records rather than assumptions.
The term "as-built" is sometimes used loosely, so it's worth being precise. An as-built survey records existing conditions — the space as it stands today, not as it was designed, not as it was supposed to be built. That distinction matters for several reasons:
Deviations accumulate over time. Buildings that are 10, 30, or 100 years old have been modified incrementally. Original drawings may be missing, partially wrong, or reflective of design intent rather than what was actually built. An as-built survey starts from reality.
Design intent vs construction reality. Even on a completed new-build, tolerances in construction mean the finished dimensions differ from the drawings. For fit-out work that needs to meet millimetre-level accuracy — joinery, raised floors, suspended ceilings — those tolerances matter.
Insurance and dilapidations. Lease-end dilapidations assessments require an accurate record of existing condition. An as-built survey at the start of a tenancy, or at the point of handback, provides that verifiable record.
As-built surveys vs as-built drawings: key differences
The two terms get conflated, but they sit at different ends of the same process. The as-built survey is the measurement exercise: a survey team captures survey data on-site, with laser scanners, a total station or tape. The completed as-built drawing is the documentation produced from that data — drawings updated to show every modification and deviation from the original design.
On a live construction project, the contractor typically marks changes on the working blueprint in red as work proceeds, throughout the construction process. At the end of the project, those redline markups are formalised into record drawings — the as-builts — issued as 2D drawings, a 3D model, or both. That as-built information then feeds facilities and construction management for the life of the building, and can be shared with team members and stakeholders by email or through a common data environment in whatever format they work in.
Are as-built drawings a legal requirement?
Not by name in the UK — but in practice you rarely have a choice. The health and safety file required under the CDM Regulations normally incorporates record drawings; most building contracts make submission of as-builts a condition of practical completion and final approval; and the Building Safety Act 2022 requires accurate, current building information for higher-risk buildings. Accurate as-built records also underpin compliance with building regulations on alteration work — and for an existing building with no reliable drawings at all, an as-built survey is how the documentation gets recreated from scratch.
How traditional measured surveys work — and their limits
A conventional measured survey uses tape measures, laser distance meters (Leica Disto and similar), and in larger projects, a total station or theodolite. The surveyor walks the space, records each dimension, and produces a sketch on site. That sketch is later converted to a 2D CAD drawing in the office. Depending on the survey requirements, the wider family of engineering surveys also comes into play: topographical (topo) surveys for external levels and drainage, utility tracing, and — on civil schemes — even environmental records such as water quality sampling points.
The manual process is dependable for straightforward spaces, but it is time-consuming, and it gets difficult fast:
- Complex geometry: curved walls, voids, plant room clutter, split-level floors — these take significantly longer to measure accurately by tape
- Multi-floor buildings: each floor requires a separate site attendance, and maintaining dimensional consistency between floors is technically demanding
- Error propagation: every manual transcription step introduces a potential error — a transposed digit in a dimension at floor level compounds by the time a designer works from the drawing
The output is typically a 2D floor plan. For most straightforward projects, that's sufficient. For anything complex, it's where LiDAR scanning becomes the more reliable approach.
What LiDAR scanning adds
LiDAR — Light Detection and Ranging — is an active measurement technology. The scanner emits rapid laser pulses and measures the time each pulse takes to return from a surface. From those return times, it calculates the precise distance to every point in its field of view.
The Galois M2 captures a dense point cloud accurate to 20mm, at a range of 0.2–25 metres. From a single scan position, it captures millions of measured coordinate points simultaneously. Complex geometry — curved walls, structural columns, ceiling voids — is captured with the same accuracy as a flat wall.
Advantages over traditional survey method:
- Speed on site: a floor that takes two surveyors half a day with tape can be captured significantly faster with LiDAR
- No manual transcription: the point cloud is the measurement, not a sketch of the measurement
- Dimensional consistency: every point is measured relative to the same coordinate system — no floor-to-floor accumulation error
- Completeness: areas a tape can't easily reach are captured automatically
File formats and what you do with them
LiDAR data is delivered in open-standard formats compatible with the principal AEC software environments:
- .las / .e57 — open standard, universally compatible, imports into Autodesk ReCap, Leica Cyclone, CloudCompare, Bentley
- .rcp — Autodesk ReCap format, preferred input for Revit and AutoCAD workflows
- .dwg / .rvt — derived outputs, produced from the point cloud by modelling. Not direct deliverables from scanning; modelling is a separate, billable step
If your project team works in Revit, the typical workflow is: LiDAR scan → .rcp → Revit point cloud overlay → modeller traces geometry → clean .rvt. The scan replaces the traditional survey; the modelling step remains. Digital tools like these also make it easy to validate the finished drawings against the point cloud — the scan stays as the evidence behind the as-builts.
When is the best time to get an as-built survey?
On a new build, the best time to commission an as-built survey is before the end of a project, not after. Capturing as-built data throughout the construction process — or at minimum scanning before ceilings and walls close up services — produces a far more useful record than reverse-engineering one at handover. For an existing building, the trigger for an as-built survey is usually a coming renovation, a lease event, or an accurate asset register: survey first, design second, and the design team starts from reality.
When to use which approach
Traditional measured survey: appropriate for straightforward single-room or small floor-plate projects where budget is limited, geometry is uncomplicated, and a 2D CAD drawing is the sole deliverable required.
LiDAR scanning: the better choice when the space exceeds around 200 sqm or has complex geometry; when a multi-floor building needs consistent dimensional data across floors; when the design team needs a Revit or BIM model as input; when FM, asset management or real estate teams need a persistent digital record; or when as-built verification is required post-construction. One scan visit can save time for everyone downstream — main contractors and sub contractors work from the same data instead of re-measuring.
Combined tour and as-built survey: if you need both a 360° virtual tour for marketing or FM records and a LiDAR point cloud for technical work, both are delivered from a single See3D site visit. There is no additional scanning time — the Galois M2 captures tour panoramas and point cloud data simultaneously. Get in touch to discuss your as-built survey.
Galois M2 — specification at a glance
20mm
Point cloud accuracy
0.2–25m
Working range
134MP
Panorama resolution
.las .e57 .rcp
Output formats